How efficient you are on your mountain bike, and how well you ride technical terrain, depends on having your suspension set properly. When set correctly, suspension gives even inexperience riders stability and control, and will prevent any rider from getting bucked off a bike.
Duncan Riffle, veteran world cup racer and SRAM’s Mountain Bike and PR Coordinator, says, “Whether you’re headed into technical terrain or just out for a fun ride, it’s just as important to check your suspension settings as it is to check your tire pressure.”
There are two kinds of bike suspension: spring shocks, most often found on entry level bikes; and air shocks, which are the most common. Spring shocks can only be tuned by changing the internal springs—get help from your local bike shop. But you can set your air shock at home or on the trail with a shock pump.
Here’s how:
1. Set sag

Sag is how much the suspension compresses with your body weight on the bike. Most suspension companies give suggested settings based on your weight and the shock or fork on your bike—they’re printed on your fork and/or on the shock manufacturer’s website. Riffle says, “Use those numbers as a starting point, then refine.” If you can’t easily locate the recommended starting pressure for your shock and your weight, it’s okay to start from scratch.
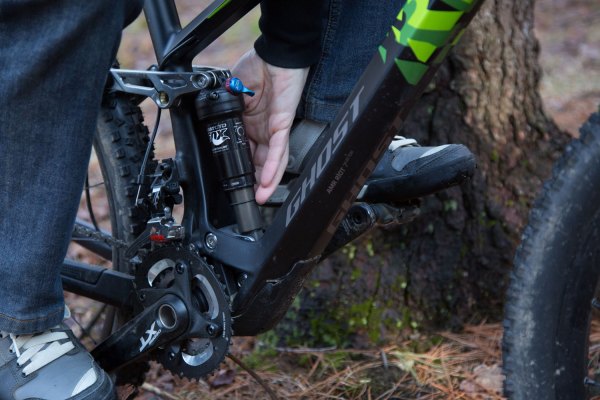
Setting sag is best done with a friend. Sit on your bike with your friend holding the handlebars. If you’re solo, set up next to a fence or railing. With your hands on the bars and feet on the pedals, assume a neutral riding position. Bounce up and down to get the shock oil moving, then sit still, and reset the rubber ring on the shock or fork piston, sliding it to where the piston enters the shock. If your shock or fork doesn’t have a ring, use a rubber band. Then, tilt the bike to the side to gently dismount without further compressing the suspension.

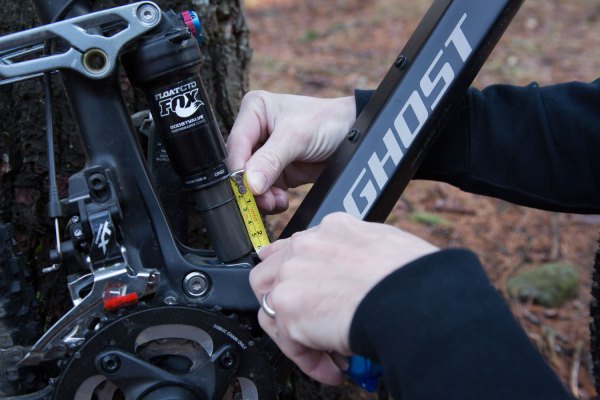
Measure the space between the ring and the shock—that’s your sag. It should be 20%–30% of the total length of the piston, which is now fully extended. With a shock pump, add or remove air through the valve on the side of your shock and on the top of one leg of your fork. Riffle says that if you make a big change in back, you should recheck the front. Repeat as needed.
2. Set Compression

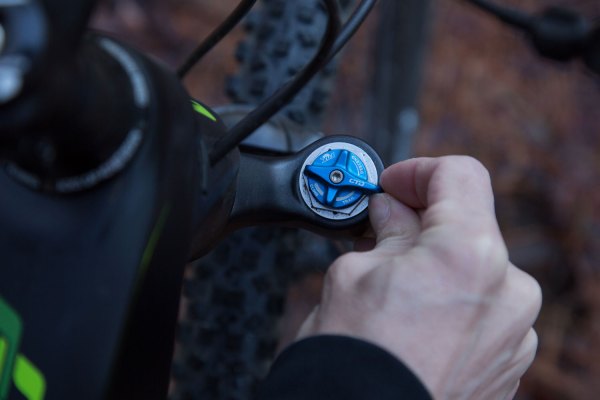
Compression is how fast your fork and shock use up their travel. If your compression is too low, your front end will dive on descents and bob on climbs. In swooping bermed turns, you’ll want slower speed compression, and on a high-speed rocky descent, you’ll want faster compression. Set the compression lever on your fork or shock—it’s usually blue. Fine-tune compression while you’re riding—shift the lever from plus to minus and back to respond to terrain.
3. Set Rebound
Twisting knobs on your shock and fork controls how slow or fast your suspension returns. “If it’s too fast, you’ll getting kicked off your bike, your bike won’t track, and your ride will feel chattery,” says Riffle. “If it’s too slow, it will pack up. The suspension won’t return to an open, supple position; it’ll feel harsh and bottom out.”
Both shock and fork have a colored—usually red—twisting knob. On the fork, it’s frequently found at the bottom of the right leg. On the shock, it’s often behind the lockout. To set rebound, turn that dial all the way to the right then push down on the handlebars to compress and release the fork. Note how the return feels. Then turn the knob to the opposite extreme, counting clicks as you do. Compress the fork and note how it feels. On one extreme, the fork will come back sluggishly. On the other extreme, the fork will come back jarringly fast. Pick a point in the middle. Compress again and note how the fork feels. Turn the adjuster two clicks in either direction, finding what feels best to you. Then, repeat the process in the rear.
“Firm up compression so you don’t dive and bottom out the fork,” says Riffle. “But not so much that you get thrown off your bike. And set up suspension equally. You don’t want a lot of sag in back and none in front,” says Riffle. “If your front is stiff, run your rear stiff too. If you like supple and soft—set both shocks that way.”
Once you have the hang of making changes, Riffle says, fine-tune rebound on the trail. “You’re going to dance around this for a little while,” warns Riffle. “Play around.”
Once you’ve nailed your ideal settings, note them somewhere so that before every ride you can check your pressure and your rebound. “Changes in weather can effect your air pressure—even five degrees can make a difference,” says Riffle. And, it’s just as important to set your suspension for a test ride—incorrectly adjusted suspension can make you hate a bike you should love.
“Ninety percent of the battle is understanding how much suspension changes the feel of a bike,” says Riffle. The other ten percent is experimenting and remembering that once you’re in the ballpark, a lot of it is personal preference.
